Effective troubleshooting requires several elements that can be developed. The single most important requirement, without a doubt, is to have an understanding of the function of each component, its importance, and how it functions – and all of these steps should be learned in a basic training. Once these basic functions are understood, the rest becomes a simple matter of applying logic or “common sense”. Here are some basic issues that typically occur on common Graco and PMC machines and how to correct them.

We highly recommend keeping printed copies of manuals and troubleshooting guides inside your rig or office. Not only are they critical to use during a breakdown but they also aid in easy parts re-ordering. With continued advancement in technology, machine manufacturers are more frequently offering cellular and computer-driven technologies on machines.
PMC Proportioner Troubleshooting
Graco Reactor Error Code Trouble Shooting Guide
| ISSUE | POSSIBLE CAUSE |
| HIGH FLUID TEMPERATURE | |
|
The “A” or “B” Thermocouple (Ref # 310) picked up a high fluid temp of 229°F (109°C) or greater. |
Check connections between the temperature control module and the heater “A” & “B” Thermocouples. Make sure all of the wires are securely connected into connector J1/SENSOR B. |
| Check continuity of the “A” & “B” thermocouples by removing the J1/SENSOR B connector from the temperature control module socket. On the plug end check the resistance across pins 5 & 6 = 4 – 6 ohms. Pins 8 & 9 = 4 – 6 ohms. Pins 6 & 9 to chassis ground as “OL” open loop at ambient temperature. | |
| One of the over temperature switches (Ref # 308) picked up a high fluid temp greater than 230° F (110°C). At 190° F (88°C) the contacts close again. | Check continuity of the over temperature switches by removing the J1/SENSOR B connector from the temperature control module socket. On the plug end check the resistance across pins 1 & 2 and pins 3 & 4 for continuity, (nearly zero ohms). |
| Either the “A” or the “B” Thermocouple has failed, or is not in contact with a working heater element. | Check and see if the “A” or the “B” Thermocouple is damaged or not making contact with a working heater element. See section Thermocouple in manual 312066 E- Series, 312063 H-Series, 313540 H-VR-Series. |
| Heater modules failed to turn off any heat zone, causing a run-away condition. | Exchange zone module with another one. Turn zone on and check for error. If error moves to another zone, replace the faulty module. (When there is a high current error, the LED on that zone’s module will turn red while the error is displayed. |
| Check and see if the heater module (BLUE) is turning off when the unit hits the set point temperature. | |
| If fluid is below 190° F (88°C) and you are still getting the high temp error. | Faulty connection of either of the “A” & “B” thermocouple to the heater control module. |
| One of the over temperature switches failed in the “open” position. Open circuit in the over temperature wiring harness, or switch “B” jumper is loose or open on a dual zone heater systems. | |
| HIGH CURRENT | |
| Electrical short in the heater module. | Hold down actual temperature key for each zone to view current output when the heat module is on. |
| Exchange zone module with another one. Turn zone on and check for error. If error moves to another zone, replace the faulty module. (When there is a high current error, the LED on that zone’s module will turn red while the error is displayed. | |
| For Hose zone, electrical short in the hose heat transformer | Check continuity of transformer windings, and if shorted to ground. |
| Perform the hose heat transformer primary and secondary check. (see hose heat transformer not functioning section in E03) | |
| NO CURRENT ZONE | |
| Tripped circuit breaker in the electrical cabinet. | For HOSE, check 183CB HOSE, and 178 CB HOSE. |
| For “A”, 187CB A. | |
| For “B”, 197CB B. | |
| Loose or broken connection on that zones output | Visually inspect and check continuity of wiring harnesses from circuit breaker module, through 238CR contactor, heater modules, and heater. |
| Check continuity in the hose set < 3 ohms, out and back, with whip hose attached. | |
See Graco Reactor Troubleshooting Guide for full list of troubleshooting tips.
PMC Proportioner Trouble Shooting Guide
| ISSUE | POSSIBLE CAUSE |
| HOSE HEATING | |
| Hose does not heat and the display on the controller shows a flashing error message “SbEr.” |
Check position 9 and 10 on the heater controller for loose wires. |
| If the wires are tight, move to the next step. | |
|
Remove the transformer cover and check that the thermocouple wires are secure to the harness going up to the controller. If there are no loose connections, disconnect the wire from the TSU and connect it directly to the thermocouple harness coming out of the hose transformer. If the controller still shows the error code, replace the hose thermocouple. |
|
| Heated hose controller shows excessive temperature. |
Set the controller set point at least 20°F (7°C) lower than the temperature shown on the controller. Briefly turn on the Hose Heater Switch and look for the LED light on the solid state relay to be lit. If the light is on, replace the controller. If the light is off, replace the solid state relay. |
| Hose will heat but does not come up to set temperature. | Check the tap setting on the transformer to ensure that the correct position has been selected for the length of hose being used. Depending on the machines incoming voltage, you may have to move the tap setting higher (up one). |
| HEATERS | |
| Primary heater does not heat and the display on the controller shows a flashing error message SbEr. |
Check position 9 and 10 on the heater controller for loose wires. If the wires are tight, move to the next step. |
|
Remove the heater cover and check that the thermocouple wires are secure to the harness going up to the controller. If there are no loose connections, replace the thermocouple. |
|
| Primary heater controller shows excessive temperature and the circuit has turned off. |
Set the controller set point at least 20°F (7°C) lower than the temperature shown on the controller. Briefly turn on the heater and look for the LED light on the solid state relay to be on. If the light is on, replace the controller. If the light is off, replace the solid state relay. |
| Primary Heater Temperature drops excessively while spraying. | Temperature of the chemical in the containers is too cold. |
| Exceeding the flow rate specification of the machine. | |
| One or more of the fire rods in the heater have malfunctioned. Remove the heater cover and disconnect the wires to measure the resistance across each rod. Installing a smaller mixing chamber in the gun may allow you to spray until a new rod(s) is installed. | |



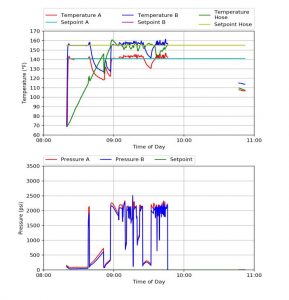
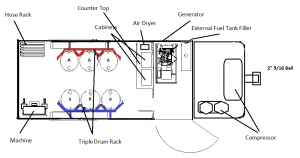
I was having issues with my temps today. The h-50 graco machine had power, but the hose heat and both a & b heat on the mother board kept shuting off. Im not sure where to start looking if i have a short. There wasnt anything wrong with the generator, of powering off of the machine. I turned the machine off and it did actually work. They never turned off again. Its wierd, and I dont want this to become an issues. Do you have any advise on what to do?
Sounds like the mother/heating board (Computer) glitched. Not much you can do if that is the case. Purchase another mother board and cable for a spare. Welcome to contact us directly to discuss. Thank You.